Imagine that on top of Jackrabbit, you have several different apps that you use every day, like an email marketing platform, a customer relationship management system, task management software, etc. These apps each serve a distinct purpose and store their own data, which creates the need to transfer that data from app to app manually, over and over again.
Wouldn't it be great if these apps could all talk with each other and automatically share that information? Think of the time you'd save! But how could that be possible with each app speaking a different language?
Enter Zapier, a super helpful translator that helps your apps understand each other's languages and work together smoothly to automate repetitive tasks and workflows🪄. Wait...it gets better! Zapier is designed to be used by anyone so you don't have to be a tech expert to set it up 💥!
Here are a few examples of what you can do through Zapier integration:
- Transfer your leads from your CRM (e.g., Hubspot or Salesforce) into Jackrabbit and automatically create a Family record.
- Implement a campaign in your email marketing software (e.g., Mailchimp or Constant Contact) for dropped students who haven’t returned after 3 months in an effort to win them back.
- Automate your to-do list in your task management application (e.g., Monday.com or Trello) based on actions happening in Jackrabbit.
These are just a few examples, but really the sky is the limit with over 5,000 applications to choose from in Zapier that you can connect to Jackrabbit!
 | We recommend downloading, printing, and reviewing the Get Happier With Zapier Checklist. |
How Does it Work?
Zapier uses something called an API (Application Programming Interface) to connect to Jackrabbit. An API works by sharing data between applications; it is the messenger that delivers your request to the application you're requesting it from and then delivers the response back to you.
Imagine you are at a restaurant. You've read the menu and are ready to order your food. You don't walk into the kitchen and tell the chef what you'd like for dinner. Instead, you give your order to the waitperson, who takes it to the kitchen. When the food has been prepared, the waitperson delivers it back to you.
In this analogy:
- The waitperson is the API.
- Jackrabbit is the restaurant that created the menu (list of available automations).
- The kitchen is the application you want to connect to.
- You are the customer. You don't even need to know how to cook 🧑🍳 to get this awesome meal!
Here's a high-level overview of how it works in Zapier once Jackrabbit is connected:
- You start with a trigger which is an event that happens in an application, e.g., a student is dropped from a class.
- When the trigger event occurs, Zapier will automatically perform an action in another application, e.g., launch an email campaign.
- This automation workflow (when this happens, do that) is called a Zap. Each Zap consists of a trigger and one or more actions. You'll create your Zaps in Zapier's user-friendly interface.
- Once the Zap is published, Zapier will automatically perform the action in one app each time a trigger event occurs in the other app.
If you are a new Zapier user, take a few minutes and review Zapier's help article Learn key concepts in Zapier to help get you started.
Get Set Up to Use Zapier
Jackrabbit User Permission
Jackrabbit's Zapier integration is controlled by one User Permission. By default, this permission is granted to Users who have been identified as having the Owner role. Users with access to update permissions can add this permission to other Users as needed.
| Category | User Permission | Description |
| Tools | Zapier API | Can view and manage the Zapier API key. |
Create a Zapier Account
Head over to Zapier.com and set up an account. They offer a free plan that allows you to create up to 100 single-step Zaps (workflows). To create Zaps with multiple actions, you'll need to upgrade. You can check out their pricing plans here.
In your free trial or on a paid Zapier plan, you can use the search action events as one of the actions in a Zap to look for duplicate records before adding a family, which is a recommended practice.
Connect Zapier to Jackrabbit
In Jackrabbit:
- Go to the Gear icon > Settings > General and select Zapier on the left menu.
- Note: If you don't see the Zapier menu option, you do not have the required Zapier API User Permission. Once the permission is added, log out of Jackrabbit and then back in to access the Zapier option on the menu.
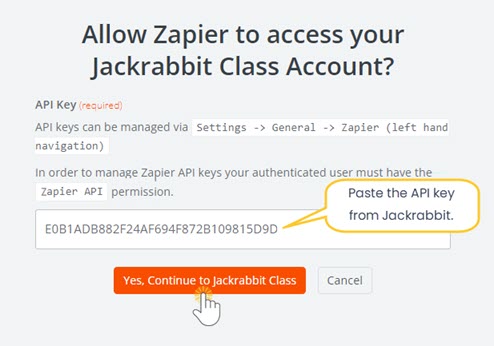
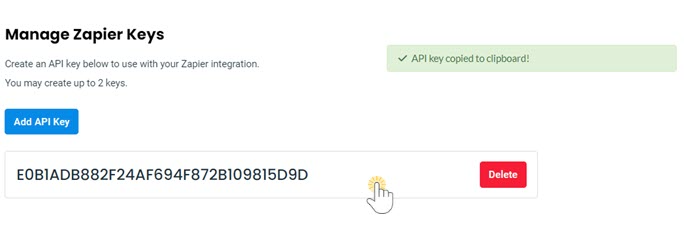
- In the Manage Zapier Keys section, select Add API Key. Once the API key appears, click into this field to copy the key to your clipboard.


In Zapier:
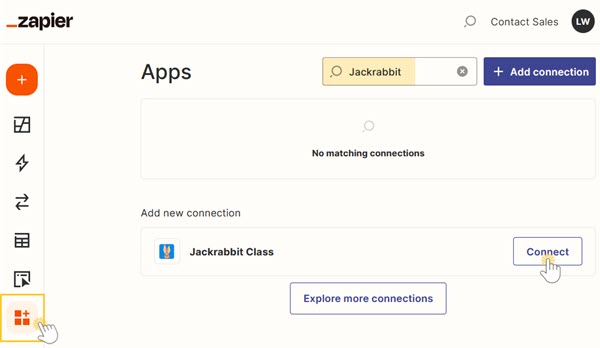
- From the left menu, select Apps.
- Enter Jackrabbit in the search field, and click Connect in the Add connection field.
- A screen will appear requesting permission to access your Jackrabbit account. Paste the API key you copied from Jackrabbit in step 2 and click Yes, Continue to Jackrabbit Class.


Now that Jackrabbit has been connected to Zapier, you're ready to create your first Zap⚡!
Create a Zap - Send Information Out of Jackrabbit
A Zap is an automated workflow that connects your apps together. Every Zap consists of a trigger step and one or more actions (single-step or multi-step Zaps).
This section steps through a single-step Zap. The Create a Zap - Send Information Into Jackrabbit section below steps through a multi-step Zap with several actions.
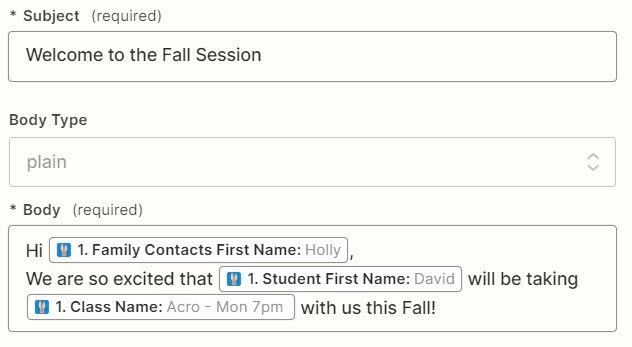
Jackrabbit's Zapier integration offers these trigger events when you are sending information out of Jackrabbit.
| Trigger Events | |
Student Dropped | Triggers when a student is dropped from a class. |
Student Enrolled | Triggers when a new enrollment is created for a student. |
Student Enrolled in Event | Triggers when a new event enrollment is created for a student. |
Student Inactive | Triggers when a student becomes inactive. Students become inactive the day after all classes have been dropped. |
Absence Created | Triggers when a new absence is created. |
Makeup Created | Triggers when a new makeup is created. |
Staff Created | Triggers when a new staff member is created. |
Substitute Created | Triggers when a new substitute is created. |
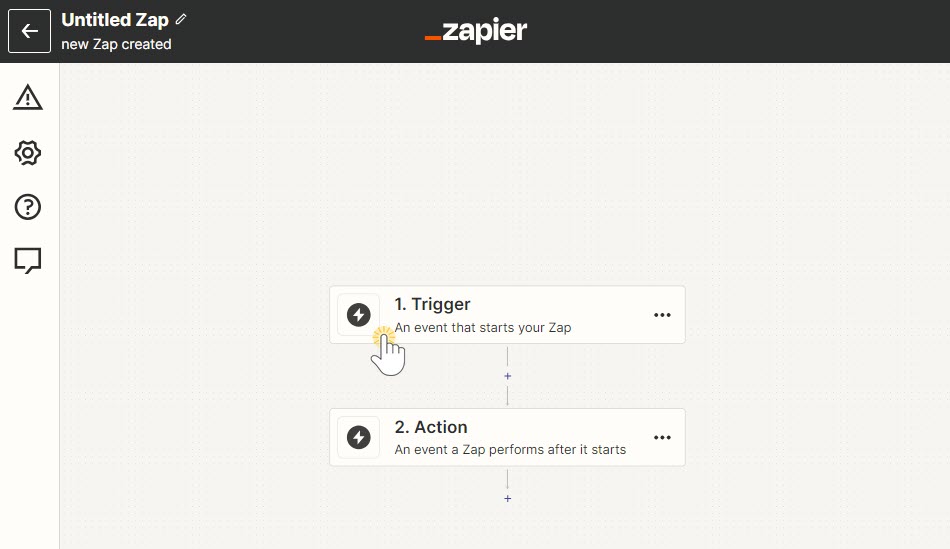
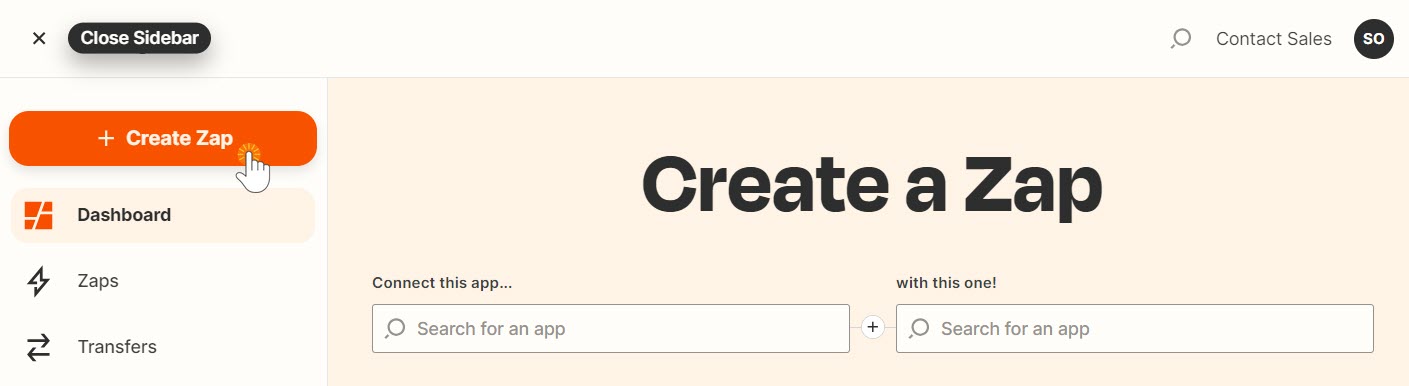
To create a Zap from scratch, log in to your Zapier account and select +Create Zap.

#1 Add your Zap trigger
A trigger is where your automation begins; it is an event that starts your Zap.
- Choose your app and event.
- In the Zapier editor click to open the Trigger step.
- In the App & event section, search for and select the app that will trigger the Zap.
- When you are sending information out of Jackrabbit into another application, Jackrabbit Class should be selected as your trigger application. Note: Be sure to select the latest edition of Jackrabbit Class.
- Click the Event drop-down menu and select the event that will trigger the Zap.
- Select one of the trigger events. The Zap will be triggered when any of these events occur in Jackrabbit.
- In the Zapier editor click to open the Trigger step.
- Choose your app account.
- If you've already connected your Jackrabbit database to Zapier, it will appear in the Account section. If not, click +Connect a new account and follow those instructions. This usually involves authorizing Zapier to access your data in that app.
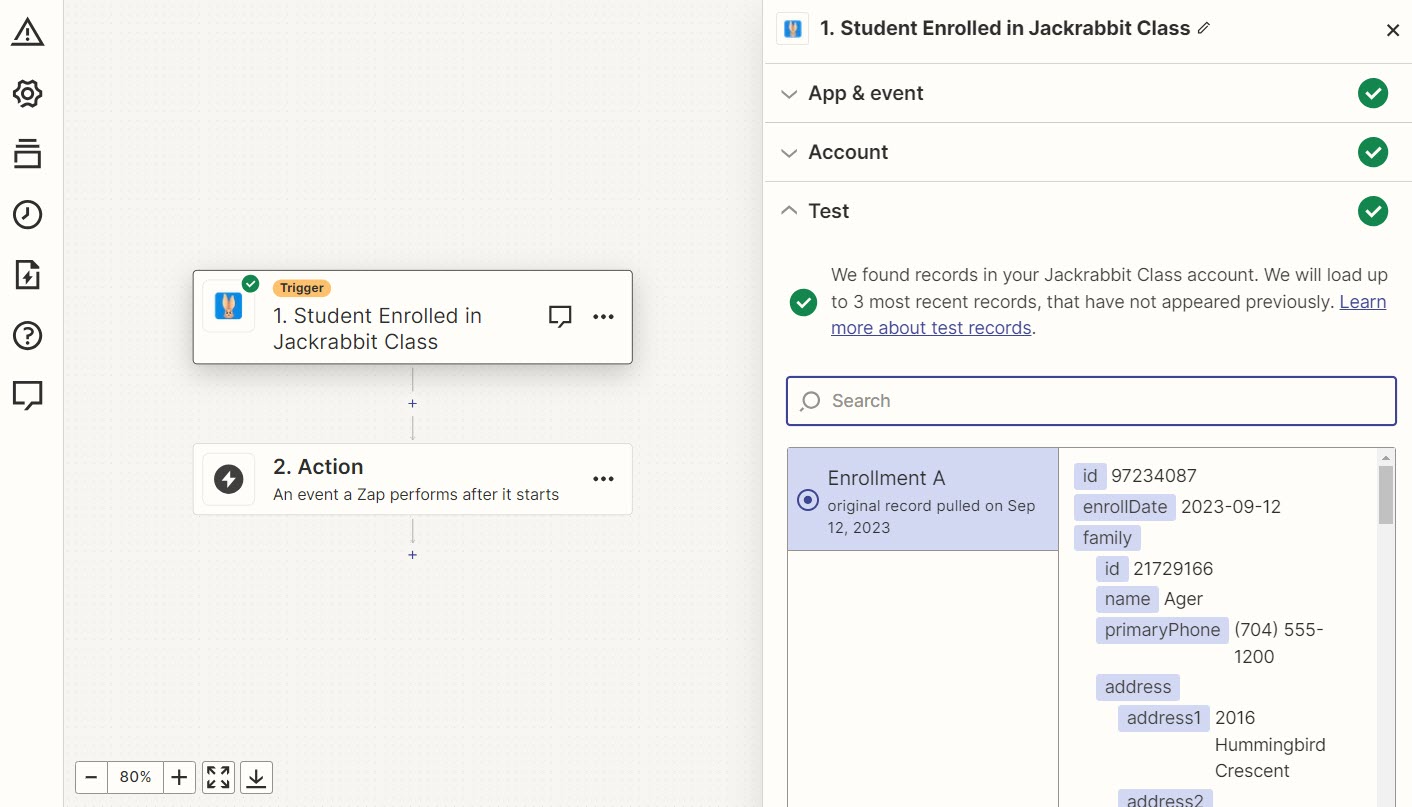
- Test your trigger.
- Click Test trigger in the Test section.
- Zapier will look for a recent trigger event from your trigger app to test and confirm your trigger is set up correctly. If you don't have an actual occurrence of the event in Jackrabbit, you'll need to create a test record before testing.


#2 Add your Zap action
A Zap consists of a trigger event and one or more action events. An action is an event your Zap performs when your trigger event occurs.
- Choose your app and event. The action app is the application that will perform the task.
- In the Zapier editor, click the Action step, or click the plus + icon to add an action to your Zap.
- Search for or select the app you want to use in your action.
- Click the Event drop-down menu and select the action you want your Zap to perform.
- Connect your account.
- If you already have an account connected to Zapier for the action app, select it from the account menu.
- If not, click +Connect a new account and follow the instructions to connect your app to Zapier.
- If the connection is working, click Continue.
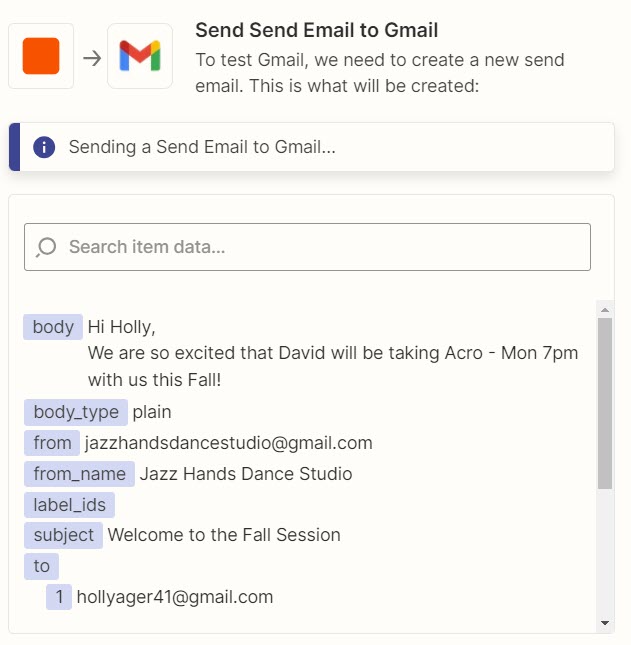
- Set up your action. This is where you set up the data that you want to send over to the action app.
- This step can involve different types of fields like drop-down menus or manual text entry fields. These are static values, meaning the Zap will send the same value to your action app every time it runs.
- In some cases, you'll be able to choose a field that was created in a previous step of the Zap; this is called mapping. These values are dynamic, meaning the Zap will send the information received for that field every time it runs. Visit Zapier's help article Send data between steps by mapping fields to learn more.
- Some fields may be optional, while others are required.
- After filling in all required fields and any optional fields, click Continue to move to the final step.
- Test your action step.
- The last step is to test to confirm your action works as expected.
- To run the action step, click Test & Continue.


#3 Name your Zap
- On the upper left of the Zap editor, click Untitled Zap.
- Enter a name for your Zap. This allows you to easily identify it on your dashboard.
#4 Publish your Zap
- On the upper right of the Zap editor, click Publish.
- Once your Zap is published, Zapier will run your action steps each time your trigger event occurs.
Create a Zap - Send Information Into Jackrabbit
A Zap is an automated workflow that connects your apps together. Every Zap consists of a trigger step and one or more actions (single-step or multi-step Zaps).
This section steps through a multi-step Zap with several actions. The Create a Zap - Send Information Out of Jackrabbit section above steps through a single-step Zap.
Jackrabbit's Zapier integration currently offers several create and search action events when you are sending information into Jackrabbit.
| Create Action Events | |
| Create a Contact (Basic) |
|
Create a Family (Basic) |
|
Create a Student (Basic) |
|
*Required fields must exist in your trigger application and be included in the event for the trigger action to complete. For example, if Google Forms is the trigger application and the trigger event is New Form Response, the source (e.g., Contact Form) must include the Family Name and Phone information for the family to be added in Jackrabbit.
| Search Action Events | |
Search Contacts by Created Date | Searches contacts by the created date range given. |
| Search Enrollments by Created Date | Searches enrollments by the created date range and Location (optional). |
| Search Enrollments by Drop Date | Searches enrollments within a given drop date range and Location (optional). |
| Search Enrollments by Enroll Date | Searches enrollments by the enroll date range and Location (optional). |
| Search for Family | Searches for a family using Last Name, Address1, Zip, Email, and Location (optional). TIP: In a multi-step Zap, use a Search for Family action to check for duplicate families before you add the Create a Family action. |
| Search Students by Birth Date | Searches for students by the Birth Date range given. |
| Search Students by Created Date | Searches for students by the Date Created range given. |
| Search Students by Dast Last Inactive | Searches for students by the Date Last Inactive date range given. |
To create a Zap from scratch, log in to your Zapier account and select +Create Zap.
#1 Add your Zap trigger
A trigger is where your automation begins; it is an event that starts your Zap.
- Choose your app and event.
- In the Zapier editor click to open the Trigger step.
- In the App & event section, search for and select the app that will trigger the Zap.
- In this walkthrough, we are going to work with Google Forms.
- Click the Event drop-down menu and select the eventthat will trigger the Zap.
- Google Forms offers two trigger event options, New Form Response and New or Updated Form Response. We are going to choose New Form Response in this example.

- Google Forms offers two trigger event options, New Form Response and New or Updated Form Response. We are going to choose New Form Response in this example.
- In the Zapier editor click to open the Trigger step.
- Choose your app account.
- Sign in to the trigger application you've selected and grant Zapier access to your account.
- Click Continue.
- Define your trigger source.
- In this example, we are using a form we created titled Contact Form. Zapier will pull from the fields in this form to complete the action step of the Zap.
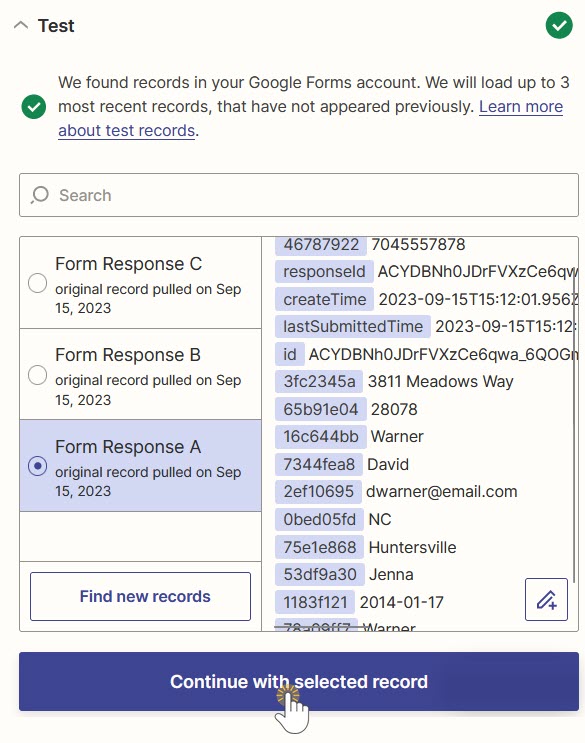
- Test your trigger.
- Click Test trigger in the Test section.
- Zapier will look for a recent trigger event from your trigger app to test and confirm your trigger is set up correctly. In this example, there must be a recent response to the Google form. If there is not an actual response, a test submission would need to be created before testing.
- Ensure the form fields were brought in as expected and Continue with selected record.


#2 Add your Zap actions
A Zap consists of a trigger event and one or more action events. An action is an event your Zap performs when your trigger event occurs.
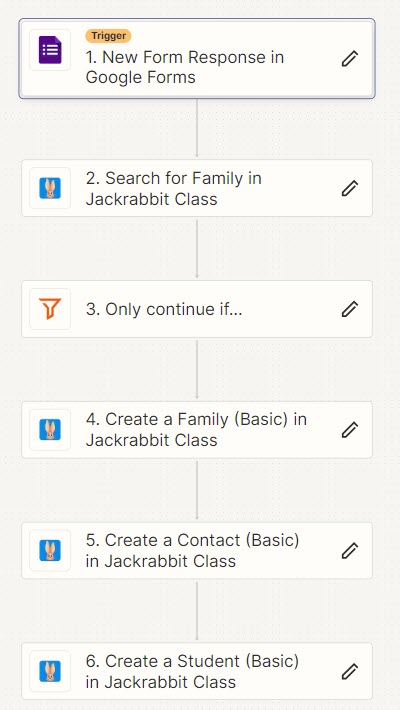
The goal of the Zap we are creating in this example is to have Zapier watch for new responses to the Contact Form and then use that information to create new Family, Contact, and Student records in Jackrabbit.
To avoid duplicate accounts being created, we will use a search event to look for existing families in Jackrabbit. This will be the first action in the Zap.
- Choose your app and event. The action app is the application that will perform the task.
- In the Zapier editor, click the Action step, or click the plus + icon to add an action to your Zap.
- When you are sending information into Jackrabbit from another application, Jackrabbit should be selected as your action app.
- Click the Event drop-down menu and select the action you want your Zap to perform. In this example, we are going to choose Search for Family.
- Connect your account.
- If you've already connected your Jackrabbit database to Zapier, it will appear in the Account section. If not, click +Connect a new account and follow those instructions.
- If the connection is working, click Continue.
- Set up your action.
- This step can involve different types of fields like drop-down menus or manual text entry fields. These are static values, meaning the Zap will send the same value to your action app every time it runs.
- In some cases, you'll be able to choose a field that was created in a previous step of the Zap; this is called mapping. These values are dynamic, meaning the Zap will send the information received for that field every time it runs. Visit Zapier's help article Send data between steps by mapping fields to learn more.
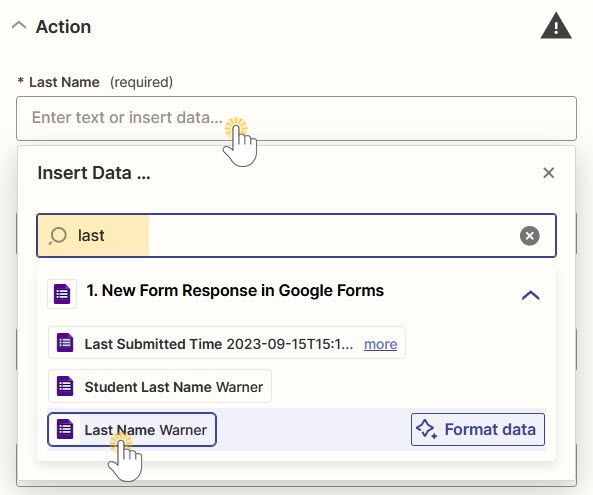
- In this example, we'll map the fields in this action to the fields from the trigger (new Contact Form response).
- Once the required fields are mapped, the last question Should this step be considered a "success" when nothing is found?determines whether the Zap stops here or carries on to a subsequent step.
- When No (false) is selected, the Zap stops here and ignores any subsequent steps.
- When Yes (true) is selected, the Zap will always run subsequent filter or path steps to allow the Zap to take further action based on the search result.
- For the purposes of this example, we'll select Yes so the Zap will continue on and add a family to Jackrabbit if no family is found in the search.

- Test your action step.
- Zapier will use a successful test as a sample for setting up the rest of the Zap.


Add additional Zap action
- Click the + icon below the search action in the Zap editor to add a new action step.
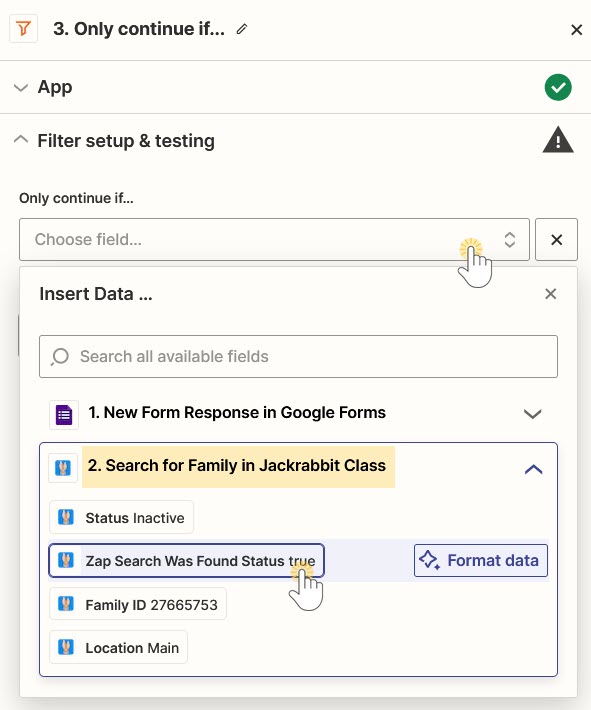
- In the Change action window, select the built-in Zapier tool, Filter, to set a condition that must be met for the Zap to continue.
- In this example, we want the Zap to continue only when the search does not find a family, so we will select the Zap Search Was Found Status field from the Search for Family in Jackrabbit Class step. We'll set the condition to (Text) Contains and enter the text true in the last filter field.
- The filter automatically tests. If successful, click Continue to add the next action.
- In this example, we want the Zap to continue only when the search does not find a family, so we will select the Zap Search Was Found Status field from the Search for Family in Jackrabbit Class step. We'll set the condition to (Text) Contains and enter the text true in the last filter field.

Add additional Zap action
To achieve the goal of adding a family to Jackrabbit when a new Contact Form response is received, and a duplicate is not detected, we'll add another action now to create the Family record.
- Choose your app and event. The action app is the application that will perform the task.
- In the Zapier editor, click the Action step, or click the plus + icon to add an action to your Zap.
- Because we are sending information to Jackrabbit from another application, we'll select Jackrabbit as the action app.
- Click the Event drop-down menu and select the action you want your Zap to perform. In this example, we are going to choose Create a Family (Basic).
- Connect your account.
- Your Jackrabbit account will be pre-selected. Continue.
- Set up your action.
- Map the action fields to the fields from the trigger step, in this case, the fields from the Contact Form response.
- Test your action step.
- The test Family record will be added to Jackrabbit; delete it after testing if needed.
- A Family ID is created and added to this step of the Zap.
Add additional Zap action
If your trigger source included the required fields, additional action steps could be added to Create a Contact (Basic) and Create a Student (Basic). Each of these action steps will use the Family ID from the Create a Family (Basic) step to ensure the records are added to the correct family.
#3 Name your Zap
- On the upper left of the Zap editor, click Untitled Zap.
- Enter a name for your Zap. This allows you to easily identify it on your dashboard.
#4 Publish your Zap
- On the upper right of the Zap editor, click Publish.
- Once your Zap is published, Zapier will run your action steps each time your trigger event occurs.
Ensure Zapier Security When a Staff Member Leaves
When a staff member leaves your company, it's important to secure your Zapier account to prevent any unauthorized access. This involves deleting the old Jackrabbit API key used to authorize Zapier access and generating a new one. Jackrabbit recommends taking the following steps whenever a staff member leaves the company.
Make sure you have already revoked the former staff member's access in Jackrabbit. You must do this before updating Zapier.
In Jackrabbit:
- Go to the Gear icon > Settings > General > Zapier (left menu)
- Note: If you don't see the Zapier menu option, you do not have the required Zapier API User Permission. Once the permission is added, log out of Jackrabbit and then back in to access the Zapier option on the menu.
- In the Manage Zapier Keys section, select Delete on your API key.
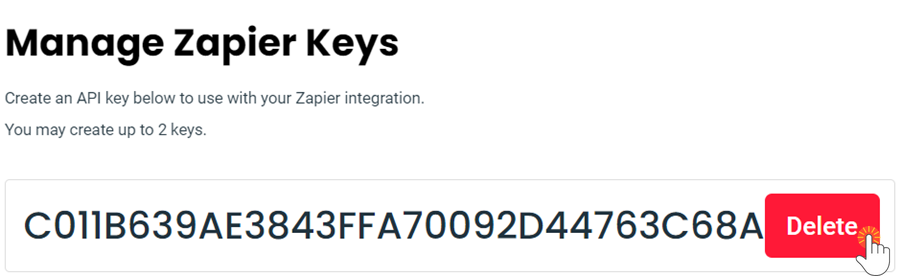
- Note: Deleting your API key in Jackrabbit will stop your Jackrabbit Zaps from running until you reconnect with a new API key in the final step.
- Select Add API Key to create a new key. Once the new API key appears, click on it to copy it to your clipboard.


In Zapier:
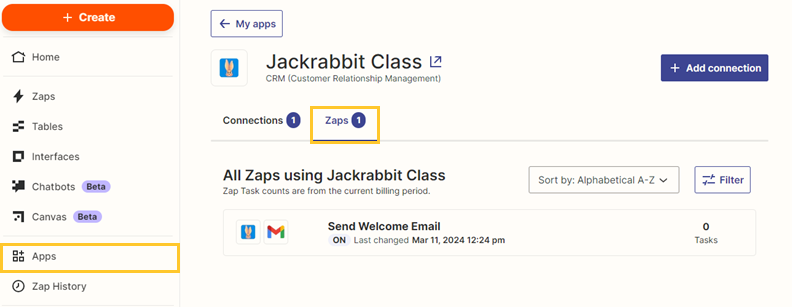
- Select Apps (left menu) > Jackrabbit Class > Zaps tab. Review all Zaps. Ensure that you understand each Zap and that none of them are unfamiliar.
- Click the Connections tab. Click the three-dot menu on Jackrabbit Class, then click Reconnect in the menu that appears.
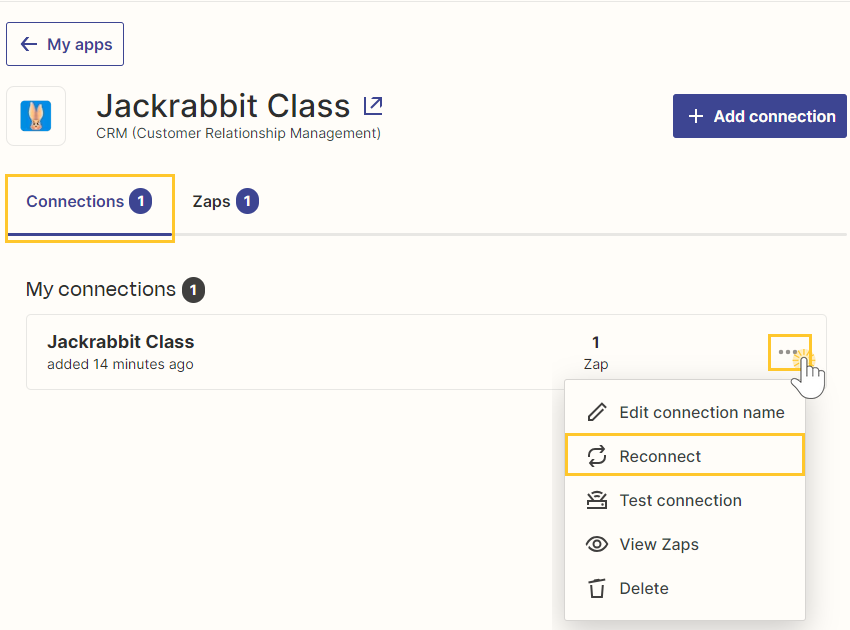
- A screen will appear requesting permission to access your Jackrabbit account. Paste the API key you copied from Jackrabbit in step 3 and click Yes, Continue to Jackrabbit Class.


Frequently Asked Questions
Q. How do I know my data is safe in Zapier?
A. Review Zapier's data privacy overview at https://zapier.com/legal/data-privacy.
Q. I am trying to connect my account to Zapier, but the button under settings doesn't show up.
A. If you do not see the Zapier option on the left menu of the General Settings page, you don't have the required User Permission, which is called Zapier API. A User with access to update permissions can add this permission to other Users as needed.
Hitting some roadblocks in the setup process? You’ve got two Help Teams ready to get you back on track! For questions about linking your account or utilizing Zapier with Jackrabbit, send us an email at support@Jackrabbittech.com. For questions about Zapier, setup, and implementation, reach out to Zapier directly.
