Virtual punch cards (e-Punch Cards) offer convenience and flexibility for your customers while creating additional revenue for you = win/win!
Jackrabbit Plus makes it easy to buy and punch e-Punch Cards directly from your mobile app!
Set Up e-Punch Cards
The first step in getting set up for e-Punch Cards is to add two drop-down list values to Jackrabbit (Gear icon > Settings > General):
| Drop-down List | List Value to Add | |
| Category 1 | e-Punch Cards | This Category 1 will organize all e-Punch Card sales for revenue reporting. |
| Transaction Type (Debit) | e-Punch Card Purchased | This Transaction Type will be used in Jackrabbit when an e-Punch Card is purchased in the mobile app. |
Tip: Use the Hide from Customers checkboxes to keep these values from being visible to your customers.
The next setup step is done in the Mobile Inventor App Dashboard on the e-Cards page, where you will set up the e-Punch Cards you'll offer.
During that process, you'll assign a Debit Transaction Type and CAT1 (both required fields). These fields must match the drop-down values you added in Jackrabbit.
See Setting up a New Punch Card in the Mobile Inventor Help Center for more details on the setup process.
Purchase e-Punch Cards
From the Mobile App
Once the e-Punch Cards are set up in your app, parents will be able to purchase them and have the fee posted to their family accounts in Jackrabbit.
- Select the Punch Cards option from the app menu.
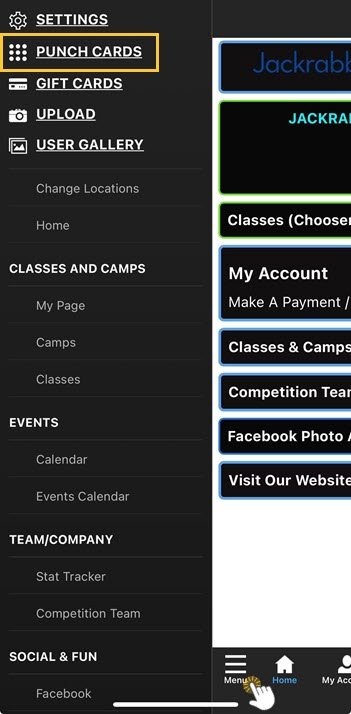
- Choose Purchase or Activate a Card. The e-Punch Card options that were set up in your app's dashboard will display.
- Select Activate for the desired e-Punch card.
- When asked if you have an activation code, select No - I Need to Purchase.
- An acknowledgment of the purchase explains that all charges for the purchase will be posted to the Parent Portal (family's account); select Continue with Purchase and then Yes to purchase the card.
Important: Payment for the purchase is not automatic; it must be generated in the Parent Portal (My Account) by the app User.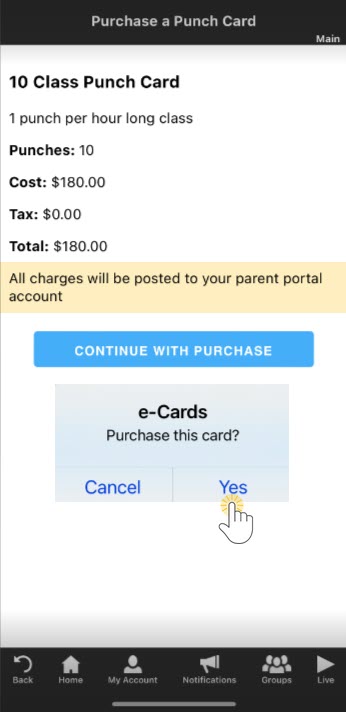
- To complete the purchase, go to My Account. If you are not logged in to your Parent Portal, you'll be prompted to log in now. Select Pay Now below the current balance, choose the e-Punch Card fee, and Pay Now.


What Happens Next?
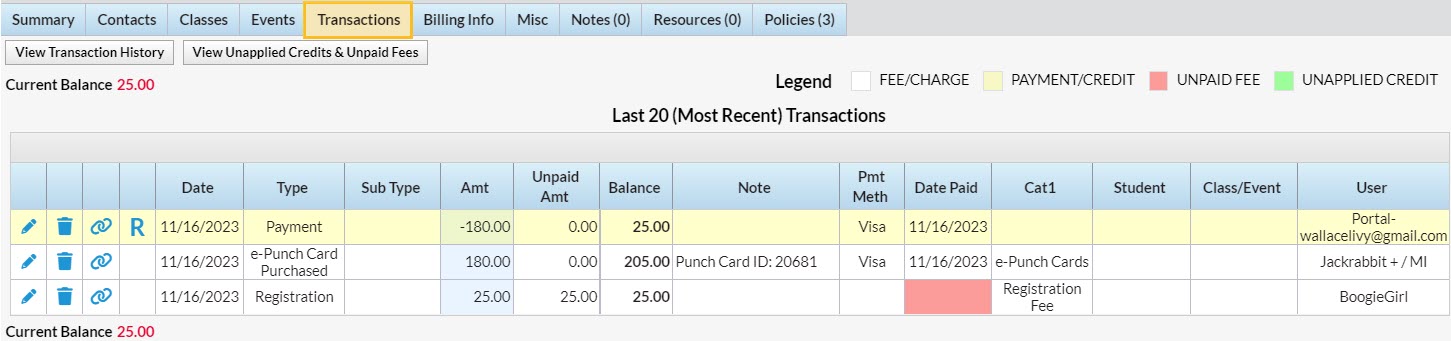
In Jackrabbit:
- The purchase of the e-Punch Card is posted to the Family record on the Transactions tab. It has been assigned a Punch Card ID number, and the User stamped on the transaction is Jackrabbit +/MI.

In the Mobile App:
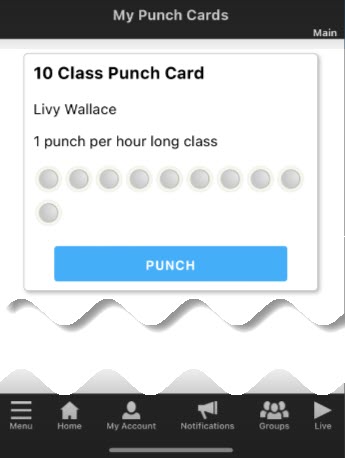
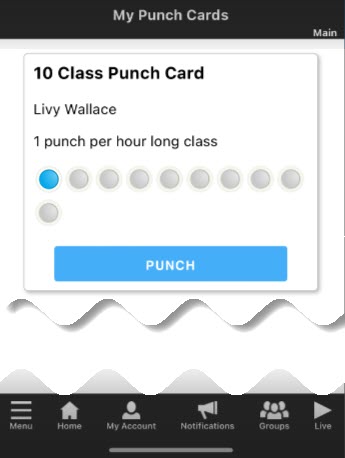
- The e-Punch Card will now appear in the My Punch Cards section of the app (Menu > Punch Cards > View My Cards) and is ready to be punched when a class is taken.

In the Mobile Inventor App Dashboard:
- The e-Punch Card is added to the Punch Cards tab of the e-Cards section in the app dashboard.


From the MI App Dashboard
An e-Punch Card can be created directly from the Punch Cards tab of the e-Cards section in the MI app dashboard.
- Select the +Add Card User button.
- In the Edit Punch User window, select the desired e-Punch Card from the drop-down menu and complete the information for the card recipient. Click Save.
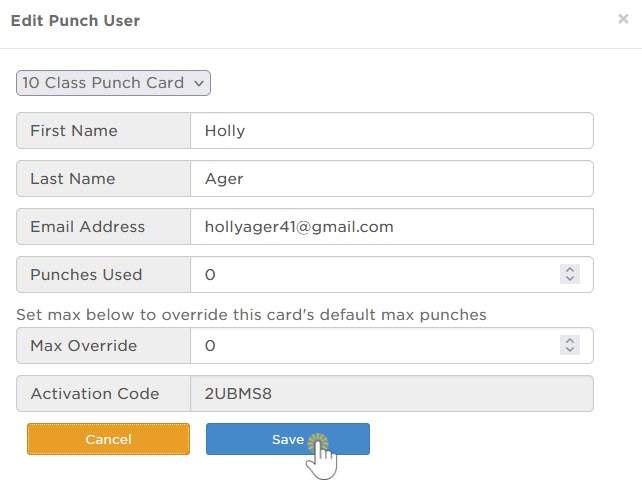

What Happens Next?
The e-Punch Card Recipient:
- An email with activation instructions and an activation code is sent to the recipient.
In Jackrabbit:
- When an e-Punch Card is added for someone from the MI app dashboard, no information is transferred to Jackrabbit.
A Jackrabbit User must post a fee using the e-Punch Card Purchased (Debit) Transaction Type and collect payment for the card.
In the Mobile App:
- The recipient will go to the Punch Cards section of their app and use the code to activate the card. Once activated, the e-Punch Card will appear in the My Punch Cards section of the app (Menu > Punch Cards > View My Cards).
In the Mobile Inventor App Dashboard:
- The e-Punch Card is added to the Punch Cards tab of the e-Cards section in the app dashboard. When added directly from the dashboard, no ID number is assigned to the card.
Punch a Card
From the Mobile App
To punch a card:
- Select the Punch Cards option from the app menu and choose View My Cards.
- Select Punch for the e-Punch Card being used and then choose Yes - Punch It.
- A confirmation will advise that the card has been successfully punched. Click OK.
What Happens Next?
In Jackrabbit:
- No information is transferred to Jackrabbit when an e-Punch Card is punched. All tracking is done from the app dashboard or in the mobile app.
In the Mobile App:
- The My Punch Cards section in the app is updated to show that the e-Punch Card was punched.

In the Mobile Inventor App Dashboard:
- The Punch Cards tab of the e-Cards section in the Mobile Inventor app dashboard is updated to show the card has been punched. The card's usage is displayed, and the card history can be viewed to see the details of each punch.


From the MI App Dashboard
An e-Punch Card can be punched directly from the Punch Cards tab in the Mobile Inventor app dashboard.
- Use the checkboxes to select the cards to be punched.
- Select the Punch Selected Cards button.
- Optionally, leave a note for your reference. This note is not visible to an app User.
- Select Yes to punch the card or select Yes & Send Push Notification to notify the app User that their card was punched. To opt out of punching the card, select Cancel.
What Happens Next?
In Jackrabbit:
- No information is transferred to Jackrabbit when an e-Punch Card is punched. All tracking is done from the app dashboard or in the mobile app.
In the Mobile App:
- The My Punch Cards section of the app is updated to show that the e-Punch Card has been punched. If a push notification was sent when the card was punched in the app dashboard, the app User will be notified that their card has been punched and given the number of punches remaining.
In the Mobile Inventor App Dashboard:
- The Punch Cards tab of the e-Cards section in the Mobile Inventor app dashboard is updated to show the card has been punched. The card's usage is displayed, and the card history can be viewed to see the details of each punch.
The Mobile Inventor Help Center provides detailed instructions for purchasing and punching e-Punch Cards in the mobile app.
Tracking & Reporting Options
When you offer virtual e-Punch Cards in your Jackrabbit Plus mobile app, it is essential to understand how to track them and report on them.
Within Jackrabbit
Paid Fees
The Paid Fees revenue report will provide information on your e-Punch Card sales during a specific date range. All payments received for e-Punch Card sales will be grouped into the Category 1 you added in the e-Punch Card setup above. In the Display Settings, select Yes for Show Transaction Details to show the Note field where the e-Punch Card ID numbers are displayed.

In the MI Admin Panel
Punch Cards Tab
The Punch Cards tab of the e-Cards menu in the MI Admin panel is a register of all e-Punch Card activity.
![]()
Important Notes
- Payment for e-Punch Cards purchased in the mobile app is not automatic. The fee is posted to the family, and the parent can then make the payment in their Parent Portal. It is a recommended practice to regularly report on e-Punch Card purchases to ensure they have all been paid for using Search Transactions filtered for e-Punch Card Purchased transactions and unpaid fees only. If you use ePayments in Jackrabbit, consider scheduling an automatic daily task to process any unpaid transactions with the Transaction Type e-Punch Card Purchased.
- When an e-Punch Card is added to a User directly through the MI Admin panel (+ Add Card User button), no fees are automatically posted in Jackrabbit, i.e., no e-Punch Card Purchased transaction is posted to a family account. A Jackrabbit User must post this fee manually, recording the e-Punch Card's Purchase ID (from the Punch Card tab in the MI Admin panel) in the transaction's Note field.
- If an e-Punch card is being used to pay down a tuition fee with each class taken, for each punch, a class credit for the fee for one class will need to be posted to the family's account and applied to the outstanding tuition fee.
